Thursday, July 28, 2011

cool kitchen: quick & easy squash salad

our garden produced a single squash so far, and well, we wanted to use it. i found martha's recipe for a marinated squash salad + thought it would pair well with our 4th of july bbq spread.

since i only had 1 squash and needed 4 for enough servings, i followed the recipe's advice for selecting squash: choose yellow squash that is glossy, firm, heavy for its size, and small. i selected the brightest, glossiest, firmest squash from the farmer's market. can you guess which of these came from our garden?

[one of these things is not like the other...the value of growing your own]


ingredients:

fresh lemon juice from 2 lemons
6 tablespoons olive oil
Coarse salt and ground pepper
4 medium yellow squashes (8 ounces each)
2 shallots, thinly sliced crosswise
2 to 3 teaspoons fresh thyme leaves (also from the garden) 
 
directions:
  1. halve squash lengthwise + slice thinly crosswise
  2. in a medium bowl, whisk together lemon juice and oil. 
  3. season with salt and pepper. 
  4. add squash, shallot, and thyme. 
  5. toss to combine. 
  6. let stand 5 minutes before serving.
easy-peasy + very refreshing.

Monday, July 25, 2011

m3: moonshine

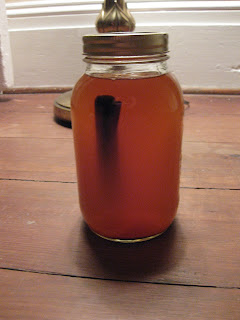
last weekend's bride + groom received a very special wedding gift.


the bride grew up joining her dad at an annual car show held at Lowe's Motor Speedway in Charlotte, which as i understand it, is pretty much an auto-themed swap meet. she + her dad would spend hours tending their "booth" at the track swapping one thing for another, and mostly people watching. over the years they became pals with their regular neighbors, some of whom are moonshine afficianados. when they found out about the engagement, they sent a special treat to the bride-to-be.

[apple pie moonshine with cinnamon stick]

not until the wedding day did she open it. while this series focuses on the many uses of the mason jar itself, lest we forget the utility of the mason jar box. these folks wrapped the special gift in a de-constructed mason jar case.

[mason jar box "giftwrap"]

[father of the bride + family checking out the goods]

the flavor was revealed: apple pie.

apple pie = danger. 

we became keepers o' the moonshine + were responsible for making sure it arrived safely at the after-party. let me just tell you,  this stuff tastes just like yo mama's apple pie. it didn't burn. it went down smoooooooooooooooooth. 

according to the bride's little bro, it's basically apple pie ingredients in a jar with a healthy helping of pure grain alcohol.

from what i understand, you can make moonshine in any flavor you wish. the basic instructions:

1. place fruit in a jar [for lemonade flavor, you'd use lemons. for apple pie, you'd use apples. etc]
2. add sugar + other seasonings [for apple pie, nutmeg, cinnamon, etc.]
3. fill the mason jar with pure grain alcohol.
4. close the jar. 
5. bury the jar in the ground, or store in a cool dry place.
6. once the fruit has disintegrated, it's ready to drink. if you use a cinnamon stick or similar hardy spice, it may not fully disintegrate. that's ok.
7. shake it up + pour. there's some discrepancy as to whether it should be chilled, served over ice, or consumed at room temperature. that's a battle i'm not getting in the middle of.

if you attempt to try your own, i'm sure you can find plenty of recipes on the world wide web. of course, i don't necessarily endorse any illegal behavior. but, if moonshine-running is what led to the wildly successful sport of NASCAR, they apparently were doing something right.


Thursday, July 21, 2011

shameless plug, yet useful app

Okay, please excuse what may seem like a shameless plug for the nbbo (non-box big orange) who pays my bills. It's really an honest & legitimate POV.

If cricket weren't in the market for a certain pickup, I doubt I'd have played with the app as much as I have, much less promote it. Of course, I'd have downloaded it to appease the guy who signs the checks.

HOWEVER, cricket IS considering selling his pathfinder & upgrading to a particular pickup named after a city in the great state of Washington. Thus, this new handy app from my employer is, well, handy. I would be lying if I didn't admit to using the app every 3 days since it launched. I'd be lying if I didn't admit to loving the way it lets me take my saved listings from one device to another to another. Even cricket appreciates it.


So...here are a few of my favorite features of the initial offering:

searching for vehicles near me: excellent. the app offers more search criteria than the mobile site does.

viewing the listing details: the photos of the listings are crystal clear (even relatively so on the ipad, despite being designed for iphone/itouch). the listings have plenty of real photos so you can get a good idea of the condition, mileage, colors, etc.


saving of listings i like: using the MyAutoTrader tool (that I created in 2006 when I was searching for my own car), I can save the listings I think Cricket will like while I'm sitting idly at the dentist, during a pedi, or otherwise engaged (ahem, not in traffic, of course). When I get home, I can easily click the icon and show the listings to Cricket. He smiles and says "well done grasshopper." Not really, but he should. I feel like such a contributor!

Of course, there are some features that aren't as useful to me, like:

VIN scan: it's a pretty cool idea, but pretty creepy too. In theory, you can scan the VIN barcode of a vehicle and the app will let you search similar cars (or if that vehicle is listed, it pulls it up for you--saving you the trouble of searching). The downside: well, you have to actually be INSIDE the vehicle to access the VIN barcode. It's great for those test driving at a dealership, but for those who see a car that strikes their fancy in the parking lot of Kroger, well, jeepers creepers. I'm not so keen on the idea of someone hanging outside my vehicle as I arrive with a cart full of groceries. Then he/she asks if they can look inside my car at the VIN? Yeah, not sure about that.

Listing your car: the app currently doesn't allow Cricket to list his car. Maybe a future deployment will allow him to upload the pics he's taken from his iphone to the listing, or at least help him price it? But, well, time will have to tell.

Try out the AutoTrader.com app for yourself, it's free on iTunes.


*I wasn't compensated for this review. Of course, they're my full-time employer so they pay my salary. However, I wasn't asked or compensated for this review or plug.

Monday, July 18, 2011

m3: lightning bugs

For this week's magical mason monday post, we're talking about something every southern child knows well. the chase, the capture, the release of the lightnin' bug.


I remember spending hours in my grandma's Memphis backyard chasing fireflies. Armed with a mason jar with a lid of carefully poked ice pick holes thanks to my dad, my sisters & I chased those lightning bugs for from dusk until bedtime. We competed for the most fireflies, the brightest jar, and the biggest of all bugs. In our older years, we smeared the poor souls on our white t-shirts for a short-lived glow.

Despite the romanticism of 3 young girls, I doubt we ever considered that we were interfering with Mr. Right finding Miss Right and the reproduction cycle of lightning bugs. Hopefully our efforts haven't diminished the population or the experience for today's young ones.

To fashion your own mason jar lightning bug kit:
  1. Grab a mason from the cupboard
  2. Dampen a paper towel & place inside the jar
  3. Place a piece of burlap over the rim OR use an ice pick to poke holes in the metal circular disc, and lock into place with the sealing lid.
  4. Run wild & catch the flashing fellas...GENTLY.
The firefly glow should last for the evening, but be sure to release them after they've served their nightlight duties.

Southern Living has a cute firefly label for your jars. Print 'em out & invite the neighborhood kids for a firefly party. Of course, it wouldn't be complete without a little fun for the adults: serve Firefly sweet tea vodka over ice with a lemon wedge & sprig of mint, in a a mason jar of course!


What's your favorite firefly memory?

Saturday, July 16, 2011

watermelon, lemonade, + berry ice pops for grown-ups

for our 4th of july gathering, i wanted a festive dessert. inspired by the grown-up pops in SL's Ultimate Backyard Pizza Party article last month, i decided gourmet popsicles + prosecco was the way to go. of course, i opted for champagne over prosecco, given the blog + all.
[via Southern Living]

i found this recipe inspiration and, as usual, added my own twist. it was fairly easy, but involved several phases for the layered effect of the popsicles.

ingredients:
6-8 popsicle molds [you could use 8oz paper cups]
6-8 wooden popsicle sticks [if you have molds, the accompanying sticks may not work due to the layering]

watermelon layer
  • 2 1/2 cups 1/2-inch cubes seeded watermelon (from 2-pound piece)
  • 1/4 cup sugar
lemonade layer
  • 1/2 cup water
  • 1/4 cup sugar
  • 1/2 cup fresh lemon juice
  • 1/4 cup orange juice
  • 1/4 teaspoon vanilla extract
berry layer
  • 2 cups fresh blueberries (from three 1/2-pint containers) 
  • 1 cup fresh blackberries
  • 1 cup water
  • 5 tablespoons sugar
  • 1 teaspoon fresh lemon juice

1. blend watermelon + sugar in food processor until smooth. pour mixture evenly into popsicle molds, about 1/3 full.

2. freeze the pops. depending on the depth of your molds, you may need to insert the sticks into this first layer. if so, it can be tricky to get them to stay in place. i used tape to hold them into place by taping off a grid over the tops of the molds. once the layer hardens, the sticks will be in place + you can remove the tape. if using commercial molds whose sticks have the "drip-catcher" or dual-purpose "lid," DO NOT USE IT. if you do, you won't be able to add the additional layers since the bottom layer will have frozen to the popsicle stick.

3. while the first layer is freezing, you can prepare the lemonade & berry mixtures. prepare the lemonade by boiling 1/2 cup water and sugar in a small heavy saucepan, stirring to dissolve the sugar + prevent from burning.

4. remove sugar water from heat. add lemon juice, orange juice, and vanilla. let cool to room temperature.

5. while the lemonade mixture cools, prepare the berry layer. stir the blueberries, blackberries, 1 cup water, and sugar in medium heavy pan until the sugar dissolves, stirring not to burn.

6. boil until the berries are very soft and easily break open with the back of a spoon. remove from heat.

7. strain the berry mixture, pressing the fruit to extract as much juice as possible. mix in the lemon juice and let cool.

8. Once the watermelon layer is frozen solid, add the cooled lemonade layer and let freeze for a few hours.

9. Once the lemonade layer is frozen, add the berry layer and let freeze until ready to serve.

[layered pops. molds from crate + barrel]

10. When ready to serve, fill large wine glasses half full of champagne. Place the frozen popsicles into each glass and serve.

[here's today's bride-to-be enjoying her last pop as a singleton! in a few hours, she'll be a Mrs.]

As the pops melt, the champagne becomes a little flavored. The combination of the flavors pleases the tastebuds. This is an absolute crowd-pleaser. Everyone will have a different favorite flavored layer + they won't last long!


If you have leftover mixtures like I did, you can easily make a granita instead of letting it go to waste.

1. after you add each mixture to the pops, pour the leftover into a small freezer-safe dish and place in the freezer. periodically rake a fork across the freezing mixture to prevent it from becoming a solid.
2. add in the remaining leftovers, and continue to rake into small granules.
3. keep it in the freezer for a quick summer treat!


Thursday, July 14, 2011

Grandma Lee Lee's biscuits

One of my coworkers at the non-box big orange (aka nbbo, not to be confused with nkotb) was featured on the Sweet Peach blog last week and, well, I have to share. Not only do the biscuits sound delish, but well, the whole darn family is cu.tie.pa.tootie. Mr. Max is adorable! So is the newest addition, who hasn't perfected his spoon-holding skills to get a spot at the kitchen counter yet. I'm sure he'll make his debut soon.

Click on over to read the full post at Sweet Peach.
I love that this recipe is an homage to Grandma Lee Lee (pictured above with my co-worked & her hubs on their wedding day). What are we without our grandparents?

Me? Well, the short list for me: I'd...
  • have never experienced ice cream drizzled in milk as an after-dinner snack, 
  • not know a thing about flowers (keeping them alive, well, I can't blame them for trying), 
  • never have watched Hee Haw or a Gaither Family Reunion for hours on end, 
  • never have visited Ted Turner's underground suite at Turner Field (thanks Walter!), 
  • never developed a love of ambrosia (an otherwise disgusting concoction, unless served by your grandmother at holiday meals...which oddly makes me crave it every year), 
  • never have developed my mad checkers skills, 
  • never have ridden the indoor carousel at Memphis' Hickory Ridge mall, and 
  • never have built some amazing structures from Lincoln Logs
For Hilly & fam, they'd have never experienced these light & fluffy biscuits. Not to mention the memories shared around the kitchen, the stories told around the dinner table, and the comfort of homemade food.

Thanks Hilly for sharing!

Wednesday, July 13, 2011

cool kitchen: basil butter


our raised garden has spoiled us with a plethora of basil. and, i love basil. but i'm struggling for new ways to use it. i'm a planner, so i've been trying to find ways to carry the summer crop into the fall + winter months for continued enjoyment.

stumbling across this recipe for basil butter was just the inspiration i needed for the recent harvest. it is super easy + super yummy. it freezes easily for use later in the year + could also make nice gifts to have on-hand. besides, with no requirement for heat, this wouldn't require me to work up a sweat in the kitchen to prepare!


ingredients:
1/2 pound of unsalted butter, softened
1 1/2 cups of loosely packed fresh basil
1/2 teaspoon garlic salt
1 tablespoon minced garlic
1 fresh lemon
ground pepper
sea salt

In a food processor, chop the basil. Add the softened butter (in small chunks), garlic salt, minced garlic, and juice from 1/2 lemon. Combine until smooth. Add ground pepper + sea salt to taste; combine until smooth.


Drop rounded spoonfuls onto a lined cookie sheet (or pie plate if your freezer space/shape dictates like mine). Let dollops freeze for several hours, until hardened.


Once frozen, remove the dollops of butter from the cookie sheet/pie plate + store in freezer bags.

The butter is divine on toasted bread + is an easy instant seasoning for chicken, fish, veggies, + steaks.

Monday, July 11, 2011

magical mason mondays

so, one of the best things about mason jars is their uncanny ability to do just about anything. not only are they versatile, but also uber stylish. i'm going to dedicate mondays to the reveal of a new use for the standby mason jar. so, prepare to be amazed on mondays + inspired to find a clever use for the pantry staple.
this week's mason jar magic inspiration:
swoon. if only our cluster of 3 peach trees weren't a) dying and b) tiny, i would have so many dinner parties set up beneath them. but, these little hanging mason jar lanterns are super easy + super functional.

we made some of these last summer from recycled baby food jars, but now i want to mix in some of the large mason sizes for varied depth. for the sake of redundancy, you can follow this tutorial to make your own. the steps are simple:

1. clean your jar
2. cut mid-to-heavy gauge wire long enough to wrap around the jar's neck, plus an extra two inches. at least 16 gauge wire is recommended, even stronger for your heavier jars.
3. create a "necklace" for your jar's neck by wrapping the cut wire around the jar's neck one time. as you wrap, create a small wire loop on each opposite side of the neck. let's call these little loops "ears."
4. fasten the "necklace" to itself by twisting the ends together. you want it to be very tight so that it doesn't slip over the jar's rim.
5. determine how you want to hang your lanterns--if you want them to blow gently in the breeze, use twine. if you want them to stay pretty still, use your wire.
6. cut the twine/wire to desired hanging length. wrap one end of the hanging twine/wire around a jar's "ear," and tighten by twisting. repeat with opposite end of twine/wire and opposite "ear."
7. fill your jar with sand
8. insert candle - tea lights for the baby food jars, votives for the regular sized masons, and even larger pillars for the larger jars for drama
9. light + enjoy the ambiance
10. if you feel like getting fancy, you can wrap your lanterns in ribbon, paint them with spray paint, or heck, even be-dazzle them for extra sparkle.

abracadabra. from mason jar to romantic night lights.

ps - these guys are sturdy enough to keep outside year-round in most climates. just dump out the water after it rains. if you live in a super hot climate, you may want to remove the candles during the summer so they don't melt. the wire will rust over time, but it just adds to the charm.