Wednesday, August 24, 2011

soon to be cruisin'

we've been planning to rebuild a vintage bike we bought off Craigslist for $60. we named the effort "the gidget project" in honor of the original 50's surfer chick who was initially overlooked by the fellas but ultimately won over the one and only moondoggie. but we've been slack, and, well, buying is a better option. wayyyyyy too many options out there to customize a bike for me, a casual rider.

so we've been cyberstalking bikesdirect.com lately for a vintage-styled cruiser for yours truly. and recently cricket got the alert that more were in stock! we missed the initial window but were able to snag one shortly thereafter. I love folks who put things in their cart and neglect to purchase. suckers! thank you very much.

it's the windsor Oxford deluxe in "ocean" and ain't she a beaut?
[via BikesDirect.com]


the deluxe (cue weezy and her apt in the skyyyyyyyyyy) means I get a rear rack, a bell, and a beverage holder. schweeeeeeeet! kinda like this:
[via BikesDirect.com]


I'm super excited to have wheels to cruise the neighborhood on! now I just need somewhere to go...

if you see me cruisin' down the road, give me a honk. I'll give you a solid bell ring back, and likely raise my cold beverage! the question remains...do you think Lula will be up for a ride in a basket???

Monday, August 22, 2011

m3: mason jar vases

okay, this isn't rocket science. but it sure give me an excuse to share photos of my sister's amazing wedding in oregon! the talented chris becerra took the amazing photos, kudos incredibly well deserved. be sure to check out his full post.

[the beautiful guest book was a gift from college friend Vivian the Bolivian. according to her native tradition, each guest signs a page with a personal note. the newlyweds later add a photo of the signatory to the page, so it serves as a photo memento]


[cheers to the beautiful bride + dashing groom!]

[gorgeous stems we picked at the u-pick farm in springfield, oregon + lovingly arranged by raina powell]

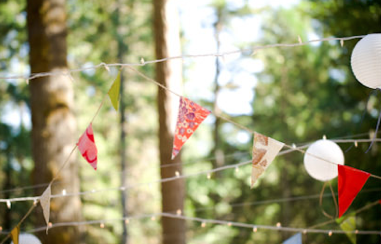
oh, and a few of the party pennants i diy'd!


[O + H = OH! get it??]

[the bride used remnants from my pennant project to fashion the banner for the cake. so cute, right?]


Wednesday, August 17, 2011

party pennant tutorial

for sister's oregon wedding, i was commissioned to fashion yards upon yards of party pennants. i think they turned out festive + fun...what do you think?

[photo courtesy of Vivian the Bolivian]
the project began when my sis sent me a crate full of remnant fabric pieces she'd picked up throughout san francisco. it ran the gamut from bright + cheery cotton prints to muted old-fashioned damask.

supplies:
  • fabric remnants (at least 18" square)
  • jute twine or other ribbon/string, cut to the length you want your banner to be, plus at least 18" on each end for easy hanging
  • fabric glue
  • sewing machine
  • thread
instructions:
prepping your triangles...
  1. create a triangle template the size of your liking by folding a piece of cardstock in half lengthwise, drawing a line from the unfolded edge to the folded edge at the angle degree of your choice. cut along the line and unfold to reveal your perfectly symmetrical pattern.
  2. fold a piece of fabric in half
  3. lay the pattern on top of the fabric, with the short straight edge against the fold.
  4. cut along the angled edges, cutting through both layers of fabric
  5. you should have two triangles, connected at the folded edge
  6. repeat with all of your fabric


positioning the pennants...
  1. unroll your twine to the desired length on a large flat surface
  2. place your triangle pennants along the twine, spacing as you like. i spaced mine approx 12-15" apart.
  3. place the twine inside the folded edge of each triangle
  4. pin into place

attaching the pennants...

  1. use a large zig-zag stitch to sew the folded edge to the twine of the first triangle
  2. cut the thread and repeat with each triangle
  3. once finished sewing all triangles, extend the banner on a large work surface. it should lay flat.
  4. place a small squiggle of fabric glue to each of the pennants. this attaches the front to the back + also gives them a little weight to prevent flipping + twisting--especially useful if using the banners outdoors or in a windy environment. this will help them hang straight + gently flutter in the breeze.
hang the banner + enjoy!