Showing posts with label under $10. Show all posts

Monday, July 9, 2012

Steal of the MidCentury: Bertoia Chairs


This Saturday we headed to Cricket's folks' house to celebrate my father-in-law's birthday. On the way, we passed what appeared to be a garage sale and something caught my eye. What looked to be vintage white Bertoia chairs caught my eye from the road, and sparked my curiosity because I'd eyed them for our new patio table...until I realized they retail for $300.

Even these on Fab.com today are offered for $279 in RUSTED condition.


So after celebrating at the in-law's, we drove back by the house to check out the sale. We trodded up the driveway and learned that the owner was cleaning out her basement. She had an assortment of stools, chairs, and such.

These beauties were marked $15, which I assumed was per chair. NOPE --for the set of three. WHAT?!?!?

So we snagged those puppies up in an instant. Packing them into the car, I kept expecting us to be arrested for snagging such a steal of a deal. No sirens. No lights. We made it home safe & sound with our new old chairs.

I wish I had the fourth, but the owner wasn't sure where it'd been misplaced. Of course I left my number in case it turns up...please Lord let it be discovered to round out my alfresco dining ensemble.

According to Fab, this classic Vintage Modern chair was designed by 50's designer Harry Bertoia as part of the Bertoia collection of wire sculpted furniture for the Knoll furniture company. In Bertoia's own words, "If you look at these chairs, they are mainly made of air, like sculpture. Space passes right through them." They've probably been in her basement for 50 years, and are in excellent shape. These guys are in perfect condition, chair pads included.


Sunday, December 18, 2011

magic reindeer food

when i was little, one of our holiday highlights was putting out the reindeer food on Christmas Eve. every year, Mrs. Gidley would deliver the magic mix to our porch, and we 3 girls were delighted to get to sprinkle it on the lawn. part of this excitement may have stemmed that this brown paper bag had likely been touched by Mrs. Gidley's son, who was SOOOOOOOO cute. cute boy aside, the reindeer food was always a favorite thing.


after we'd open our Christmas PJs on Christmas Eve, we'd put on our slippers, bundle up, and sprinkle the mix on the front yard to make sure Santa's reindeer had a snack while he was so busy unloading our loot. then, we'd argue over who got to color which part of the reindeer.


Mrs. Gidley's mixture consisted of hay and glitter packaged in a brown paper sack, and it always had a hand-drawn reindeer picture for coloring. apparently, glitter isn't bio-degradable, so i had to adjust the mix to be environmentally friendly and all. but the packaging stayed the same.

Ingredients:
Oats - duh, reindeer LOVE oats
Colored sugar - creates the "magic" sparkle to help the reindeer find your house
Cypress fronds - gives it a Christmas-y smell to help the reindeer know it's safe to eat


Instructions:
Evenly disperse the oats among the dozen or so bags (about 1/3 cup each). Sprinkle sugar crystals into each bag. Top off with some cypress fronds (I salvaged mine from the porch where my garland was shedding). Give it a shake.

Fold over the top of each bag + staple the coloring label onto the front. I stamped each one with our name so folks knew where they came from, too.


You can download my coloring labels here. 2 will print per page, and they fit perfectly onto the average brown paper lunch sack. If you're distributing to a household with siblings, you may want to tack on enough coloring labels for each child to avoid a small war.

The label's poem reads:
Sprinkle on your lawn at night
Rudolph's nose will make it sparkle bright.
As Santa's reindeer fly and roam,
This will guide them to your home.

Drop them off to your friends + neighbors with school-age kiddos the week before Christmas.

Tuesday, November 22, 2011

spiced rum sauce

picked up this little gem up over at epicurious. super easy, super rich, super yum. it's perfect with the drunken cranberry bread pudding, or spoon it onto some ice cream, or drizzle it over brownies. um, or both.

ingredients:
1 cup (packed) golden brown sugar
1/2 cup (1 stick) unsalted butter
1/2 cup whipping cream
2 tablespoons spiced rum or dark rum
3/4 teaspoon ground cinnamon


preparation:
stir brown sugar and butter in heavy medium saucepan over medium heat until melted and smooth, about 2 minutes.


add cream, rum, and cinnamon and bring to simmer. simmer until sauce thickens and is reduced to 1 1/2 cups, about 5 minutes. serve warm.

makes about 1 1/2 cups. 

what makes it great for entertaining? well, it can be prepared 2 days ahead. simply refrigerate it in a covered dish, then bring to a simmer before serving.


Saturday, November 19, 2011

luggage stool re-do

originally, this stool served as lula's window perch. but, after we replaced her perch with a chair a few weeks ago, it was time to re-purpose the stool for the guest room.

as a pet perch, it had dark brown stained legs + i had covered the "leather" cushion with outdoor fabric to match our living room AND hide dog hair.
after removing the cushion, i lightly sanded the frame then painted the legs with gloss black paint. it took about 3 coats.
as the paint dried, i used my handy staple gun to re-upholster the cushion. i centered the fabric and flipped it over. i pinned in place to keep it taut, then stapled from the center to each edge, saving the corners for last.


with all edges tacked, i tackled the corners. i wanted a tight pleat, so i folded and stapled. i had originally planned to sew a custom cover for the cushion, but the stapling was MUCH quicker.

with the paint dry, i screwed the cushion into the frame and voila! perfect spot for guests to put their suitcases during their visit.

stay tuned for the big guest room reveal to see how it fits in its new home!

Friday, November 18, 2011

wild mushroom cornbread + pecan dressing

this Martha recipe can be either stuffing (to stuff inside your bird to cook) or dressing (to cook separately). since we smoke our turkey, we opt for dressing.

[via]

for this recipe, I make the cornbread a few days in advance using a 50/50 mix of Jiffy corn muffin and Jiffy corn bread mix. The muffin mix is sweeter than the bread mix, so I like the blend. You'll likely have extra, so you can serve it to your guests.

if you can't find this exact mushroom mix, any wild combo will work. Just avoid button & portabello varieties because the richness of this dish comes from the nutty flavors of the wild mushrooms. the mushrooms are the most expensive part of this dish.

ingredients:
1 1/2 cups pecans, chopped (i also toasted an extra 1/2 cup for my salad)
6 tablespoons unsalted butter
5 cups prepared cornbread
5 shallots, finely chopped
1 stalk of celery, diced
10 ounces wild mushrooms (chanterelles, oyster, + shitake mix), slightly chopped
1 teaspoon fresh thyme
1 teaspoon fresh rosemary
1 teaspoon salt
1/4 teaspoon black pepper
1/4 cup dry white wine (chardonnay)
1/3 cup heavy cream
1/3 cup chicken stock

Preheat oven to 425.

Toast pecans in a single layer on a large baking sheet for about 6 minutes or until fragrant. Set aside.

Cut cornbread into 2-inch thick slices and place, cut side down, on a baking sheet. Melt 2 tablespoons of butter and brush over cornbread slices. Toast until golden brown, about 10 minutes. Cool on a wire rack.

Heat remaining 4 tablespoons of butter in a medium skillet on medium high. Add shallots and celery, stirring until softened. Add mushrooms, herbs, salt, and pepper, cooking until softened. Add white wine, cooking until absorbed. Add cream + cook for about 30 seconds. Remove from heat.

Crumble cornbread into large bowl. Add mushroom mix and toasted pecans. Add chicken stock. Toss well to combine. Transfer to a buttered baking dish and cook at 425 for approximately 30 minutes until top is crusty + golden brown.


Yield: 8 cups


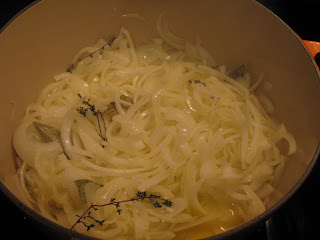
french onion soup

as the cold weather sets in, my craving for warm, rich soups is heightened. this french onion soup recipe is super easy and only has a few basic ingredients. i found this recipe on epicurious and thought i'd try it out. i didn't have oven-safe crocks, so i adapted slightly.

as a bonus, this is a pretty cheap meal that you will yield leftovers. perfect for the next chilly night when you want to put on your pj's and watch TV.

ingredients:
2 lb medium onions, halved lengthwise, then thinly sliced lengthwise
3 sprigs fresh thyme
2 Turkish bay leaves or 1 California
3/4 teaspoon salt
1/2 stick (1/4 cup) unsalted butter
2 teaspoons all-purpose flour
3/4 cup dry white wine
4 cups reduced-sodium beef broth (32 fl oz)
1 1/2 cups water
1/2 teaspoon black pepper
6 (1/2-inch-thick) diagonal slices of baguette
6 oz shredded Gruyère

preparation:

Cook onions, thyme, bay leaves, and salt in butter in a 4- to 5-quart heavy pot over moderate heat, uncovered, stirring frequently, until onions are very soft and deep golden brown, about 45 minutes. 


Add flour and cook, stirring, 1 minute. Stir in wine and cook, stirring, 2 minutes. 

Stir in broth, water, and pepper and simmer, uncovered, stirring occasionally, 30 minutes. 

While soup simmers, put oven rack in middle position and preheat oven to 350°F.

Arrange bread in 1 layer on a large baking sheet and toast, turning over once, until completely dry, about 15 minutes.

Discard bay leaves and thyme from soup and divide soup among crocks, then float a piece of toast in each. 

Sprinkle Gruyère to cover tops of crocks. If you have oven-safe crocks, you should place under the broiler for 1-2 minutes until bubbly.


Thursday, November 17, 2011

roasted brussel sprouts + artichokes

this is an easy + yummy thanksgiving side dish that i originally found in Cooking Light. it's one of those hands-off dishes that allows you to enjoy your company instead of being a slave to the stovetop. it also doesn't involve expensive ingredients, so it's affordable for a large gathering. of course, i made it my own.

[via cookinglight.com]
ingredients:
3 tablespoons breadcrumbs
3 pounds of brussel sprouts, trimmed + halved
16oz artichoke hearts (non marinated)
1/4 cup finely chopped pancetta (about 1 ounce)
2 tablespoons lemon juice
1 teaspoon olive oil
1/2 teaspoon salt
3-5 garlic cloves, thinly sliced
2 tablespoons grated parmesan cheese

instructions:
Preheat oven to 425.

Toast the breadcrumbs for about 5 minutes or until golden.

Combine sprouts, artichokes, pancetta, lemon juice, olive oil, salt, and garlic in a large baking dish coated with cooking spray. Toss to coat. Bake at 425 for 20 minutes or until sprouts are tender + lightly browned on edges. Stir 2-3 times during cooking.

Combine the breadcrumbs + parmesan. Sprinkle over sprouts + serve immediately.

Yields 12-15 servings (3/4 cup each)

This recipe works well with the others on my menu. I made some adaptations from the original by adding artichoke hearts, subbing pancetta for country ham, and altering the cook temp & time to work with my other dishes.

Tuesday, November 15, 2011

crock pot jambalaya

since it's getting cooler outside and it's dark when i get home these days, i don't really feel the urge to cook elaborate meals during the week. so, i've turned to my old friend in the pantry: the crock pot. there's a whole trend happening these days with the crock pot chicks or whatever they are, so i figured i'd revisit the slow cooker.


i've always had a hard time with slow cooker recipes. the meat is mushy. the cook time is 4-6 hours (and i work a full 9 hour work day including my commute). and, most annoyingly, half of the ingredients are processed.

so i finally found a recipe worth trying that doesn't involve "imitation cheese product" or vats of condensed soup.

ingredients:
1 pound chicken breast, cubed
1 package andouille sausage links, as spicy as you prefer
1 small onion, diced
1 rib of celery, diced (if convenience is a factor, you can buy the pre-diced packages at your grocer)
2 cans of diced fire-roasted tomoatoes, including juice
1 cup low-sodium chicken broth
1 teaspoon cayenne
2 teaspoons cajun seasoning
2 teaspoons dried herbs (i use a mix of thyme, sage + oregano, but anything you have will work)
1 pound frozen COOKED shrimp, tails off

preparation:
put everything in the crock pot, except the shrimp.

cook for 8 hours (or from the time you leave till the time you get home) on low. you could speed this up to 5 hours on high.

30 minutes prior to serving (or when you get home), add the frozen shrimp to the crock + stir them in. you can crank the sucker up to high at this point if you're hungry.

in the meantime, prepare some rice (big fan of the Trader Joe's brown rice packets).

once shrimp are heated through, serve over the rice. add a few slices of toasted crusty bread if you'd like to sop up the goodness.


this recipe makes plenty of leftovers, as you can see. we've gotten at least 2 more rounds of meals out of it, and it gets better with age.

enjoy!

Thursday, October 13, 2011

mmmm..... mussels (with bacon)


the chilly rainy weather calls for soups, chilis, + stews. we put on a pot of chili to slow-cook tonight so we could enjoy it later in the week. simultaneously, we prepped some mussels in a white wine garlic broth for dinner. cricket had the genius idea to add bacon. brilliant!!

[4 slices of bacon cut into 1/2 inch pieces, cooking until crisp. i love this smell]
[about 8 cloves of garlic & 2 shallots, roughly chopped]
[2.5 cups of white wine, italian seasoning, + crushed red pepper added to the crispy bacon + sauteed garlic & shallots]
i remember the first time i ever tried mussels. i must have been averse to them for some reason, though i couldn't tell you why. i've loved raw oysters & crawfish since i was 18 months old, so it wasn't a seafood-in-a-shell issue or a texture issue. i think i'd just always been intimidated by them. i wasn't sure how to eat them, how to prep them, how to open them.

that was until a fateful day a group of work friends went out to celebrate...celebrate exactly what, i can't remember. but i do remember that lara ordered mussels. i smelled the rich garlicky aroma long before they arrived at the table, and when they were placed in front of me, i must have experienced what recovering alcoholics face every time they walk down a bar-lined street. an all-over tingle that made me incredibly envious of my neighbor's plate. the warm rich broth covering those peculiar shelled sea-nuggets perplexed me. lara was sweet enough to share, and the love affair began.

[1.5 pounds of washed + de-bearded mussels]

for a long time, i assumed that the preparation was incredibly complicated, something only accomplished culinary experts should attempt. so i just ordered them at restaurants. i mean it was a lot to deal with: the hard shells, the fuzzy beards, the seafood smells, the popping or not-popping safety confusion. it was all a lot to consider.
[my version of cooking with wine: some for the mussels, some for me.]

i'm not sure what inspired me to finally attempt it, but i remember my first time. it was at my old condo, entertaining my now in-laws. maybe for some special occasion, but maybe not. i was amazed at how incredibly simple these suckers were. and it combined some of my favorite ingredients: wine, garlic, butter.

[whisking the butter into the broth]
so tonight, once i got them on the brain, there was no turning back. cricket suggested adding some bacon to them...somehow. so i scoured for recipes and decided to modify this one from always order dessert.

serves 2 for dinner (4 for an appetizer)

Ingredients
2 pounds mussels [i ended up cooking about 1 1/2 pounds after losing 1/2 pound that had "popped"]
3 tablespoons olive oil
4 strips center-cut bacon, cut into 1/2 pieces
2 large shallots, thinly sliced
8 large garlic cloves, smashed
1/2 teaspoon crushed red pepper flakes
1/2 teaspoon italian seasoning
2.5 cups white wine (i used Chardonnay)
3 tablespoons butter
Kosher salt
Fresh ground pepper
rustic italian baguette (or other crusty loaf)

1. Scrub and debeard the mussels under cold water. Discard any that are cracked or which do not close completely after being touched. Set aside.

2. In a large dutch oven or other heavy bottomed pot, heat 3 tablespoons of olive oil over medium heat. Add the pieces of bacon and let cook until fat is rendered and bacon is crisp.

3. Add the shallots and garlic and saute until shallots are translucent and garlic has just a hint of color (about 2-3 minutes).

4. Warm the baguette at 250F for about 5 minutes.

5. Add wine, red pepper, and italian seasoning and bring to a simmer. Once the wine is boiling, add the mussels to the pot and cover. Let mussels steam for 2-3 minutes, then gently toss. Recover and let steam for an additional 4 minutes, until most of the mussels have opened all the way. (there may be a couple that don't open)

6. Use a slotted spoon to remove the mussels to a large bowl. Discard any mussels that didn't open all the way during cooking.

7. Return the pot with the broth to the flame and whisk in the butter. Season with salt and pepper. Let simmer for 2-3 minutes until slightly reduced.

8. Pour broth over the mussels and serve with a warmed bread.

Enjoy!

Mussels are incredibly inexpensive. Our market sells them for like $2.50/pound, so this is a very affordable meal for two.
Mussels, 2 lbs = $5.00
White wine, cheapo Chardonnay = $2.50
Pair of rustic baguettes = $3.00

Total cost for dinner for 2 = $10.50

ps- i finally tried picnik to edit these photos--i think i like it!


Monday, August 29, 2011

m3: mason jar southern peach cobbler

as summer drifts away [okay, seems like kids are back in school but it's still a zillion degrees out], no southern summer is complete without homemade peach cobbler. and why not serve it in a mason jar?

[via]

it's a perfect way to serve cobbler, as it's the perfect portion! no fighting for the last bite--everyone has their own. since she's a georgia gal, i'm trusting paula deen knows her way around a peach cobbler filling. i'm adapting the cobbler itself + instructions for the mason jars.

preheat oven to 375.

for the filling:
4 cups [about 16 whole] fresh peaches, peeled, pitted, + sliced into small wedges
1 cup sugar
1/2 cup water

combine peaches, sugar, + water in heavy saucepan. mix well. bring to boil + simmer about 10 minutes. remove from heat.

for the batter:
1 cup bisquick mix
1 cup sugar
1 cup milk
1/2 cup melted butter
dash of salt

mix bisquick, water, salt, + milk in mixing bowl. stir well. add melted butter + combine. set aside


assemble the cobbler jars:
line a large baking dish with a non-stick liner [silpat or parchment paper will work]. spray 8 4-ounce mason jars with non-stick cooking spray. place jars in baking dish atop liner.

fill each jar with 3-4 slices of peach filling. top with 1-2 tablespoons of batter.

cook 30-35 minutes until tops are golden + bubbly. let jars cool to touch. top with vanilla ice cream + enjoy.

[via]


Monday, August 8, 2011

m3: ice cream in a jar

it's hot. brutally hot. the heat index last wednesday was forecasted at 104 degrees. brutal. lucky for me, i'm in oregon where the high is 75.

for those of you not as lucky, here's some magical mason monday inspiration sure to cool you off.


mason jar ice cream!

here's an easy-peasy tutorial from theyummylife, so i won't be redundant.

[via theyummylife]

not only do they look divine, but i'm infatuated with the umpteen ways that you could package the cuteness out of these suckers.

like the wedding favors they did on stylemepretty here:
[via smp]

 or make a festive ice cream sundae:
[via firststreeticecream]


or brownie a la mode like here

[via just a taste]

happy monday!!

Monday, July 11, 2011

magical mason mondays

so, one of the best things about mason jars is their uncanny ability to do just about anything. not only are they versatile, but also uber stylish. i'm going to dedicate mondays to the reveal of a new use for the standby mason jar. so, prepare to be amazed on mondays + inspired to find a clever use for the pantry staple.
this week's mason jar magic inspiration:
swoon. if only our cluster of 3 peach trees weren't a) dying and b) tiny, i would have so many dinner parties set up beneath them. but, these little hanging mason jar lanterns are super easy + super functional.

we made some of these last summer from recycled baby food jars, but now i want to mix in some of the large mason sizes for varied depth. for the sake of redundancy, you can follow this tutorial to make your own. the steps are simple:

1. clean your jar
2. cut mid-to-heavy gauge wire long enough to wrap around the jar's neck, plus an extra two inches. at least 16 gauge wire is recommended, even stronger for your heavier jars.
3. create a "necklace" for your jar's neck by wrapping the cut wire around the jar's neck one time. as you wrap, create a small wire loop on each opposite side of the neck. let's call these little loops "ears."
4. fasten the "necklace" to itself by twisting the ends together. you want it to be very tight so that it doesn't slip over the jar's rim.
5. determine how you want to hang your lanterns--if you want them to blow gently in the breeze, use twine. if you want them to stay pretty still, use your wire.
6. cut the twine/wire to desired hanging length. wrap one end of the hanging twine/wire around a jar's "ear," and tighten by twisting. repeat with opposite end of twine/wire and opposite "ear."
7. fill your jar with sand
8. insert candle - tea lights for the baby food jars, votives for the regular sized masons, and even larger pillars for the larger jars for drama
9. light + enjoy the ambiance
10. if you feel like getting fancy, you can wrap your lanterns in ribbon, paint them with spray paint, or heck, even be-dazzle them for extra sparkle.

abracadabra. from mason jar to romantic night lights.

ps - these guys are sturdy enough to keep outside year-round in most climates. just dump out the water after it rains. if you live in a super hot climate, you may want to remove the candles during the summer so they don't melt. the wire will rust over time, but it just adds to the charm.

Thursday, February 17, 2011

jewelry pocket organizer

as a girl, one of our  most important challenges is what to do with our collection of jewels. right? i mean, there are really only a few options out there.
  • you can tuck it away in a pretty jewelry box, but i'm of the outta-sight, outta-mind persuasion.
  • you can display your baubles on a pretty necklace tree, but it never fails that i want the one at the very back of the row + i make a huge mess tangling them to get the one i want.
  • hang them on the wall, but i don't have enough wall space
so, a while back i came up with this clever solution. it's worked for me for over a year now, so it has some sticking power. that's a lifetime in my world of organization! i'm known to organize, reorganize, and reorganize the reorg. so, when i find something that works, it's pretty substantial.

it's pretty simple: simply re-purpose a hanging shoe organizer to store your necklaces + bracelets. an organizer with clear pockets makes it easy to see your options, yet stores each necklace individually so it doesn't tangle.

i hang the more intricate necklaces from the top hook, + i use the larger top pockets for bracelets. i can clip any corsages, flowers, etc to the pockets as needed.


the trick: use a STURDY hanger + hook to hang the organizer on the back of the door.

cost: $5

Sunday, January 16, 2011

typography painting

the next project for cricket + me was to figure out what to do with the space above our new sofa.

we knew we wanted to incorporate his late aunt's painting--we just weren't sure how. it's not large enough to be the only piece above the sofa, but we don't want to hide it away in the office either. so...we (err, i), decided on a salon-gallery wall type arrangement that caught my eye on Rhoda's Southern Hospitality blog. it'd give us the flexibility to mix things up as we fell in + out of love with different things, and it allowed us to incorporate bobo's painting (cricket's nickname for his aunt--no one knows why).

so, we would need some things to hang on said salon wall. inspired by momma hen's pottery barn knock-off, the project took shape.

pottery barn inspiration


i had a large canvas leftover from a garage sale that would be the perfect size. see the painting with the dancing girls on the far right? i picked it up at garden ridge when i bought my first condo back in 2006. cricket wasn't fond of the dancing ladies. (sidenote- the garage sale day turned out to be gorgeous. i'd by lying if i said we didn't lounge on the unsold sofas drinking bloody marys with the neighbors until the sun went down. i'm sure the late afternoon shoppers scored some great deals, but i can't really remember!)


1. instead of using random numbers, i used several numbers that had some sentimental value to them: our wedding date (8.15), engagement date (1.29), the day we adopted our dog (1.27), our birthdays, etc. personalized without being cheesy.

2. i played around with fonts in MS Word and decided to mix and match them. i calculated the scale of my painting to get the layout how i wanted.


3. i applied a few coats of black acrylic craft paint on the canvas. it took 3 coats due to the bold colors on the original that i was trying to cover up.

4. i printed out the individual numbers in the correct relative size and cut them out to create a stencil. then, i traced them onto the black canvas using a light pencil.

5. i filled in the shapes with antique white craft paint. i definitely had shaky-hand syndrome + was using too large of a brush. luckily, cricket is an artist-type so i recruited him for the edge work.

6. after the 2 coats of antique white dried, i used fine grit sandpaper to rough up a few spots to get the aged look. i focused on corners/edges to mimic where i thought the painting would take the most abuse over the years.

7. once sanded, i aged the painting using a diluted umber craft paint. i watered it down to thinner consistency + used water to achieve the intensity i was going for in each section.

voila!


we're waiting on bobo's painting to be back from the framing shop where it was being re-stretched and then they'll all go up on the wall. i picked up some ornate gilded frames from a consignment shop this weekend to add to the gallery wall, too. i'm excited to get them all on display!

supplies:
canvas
word-editing software
scissors
paintbrushes
paint: i used delta creative antique white (02001), burnt umber (02025), and black
sandpaper (i used fine and medium grit)