Showing posts with label m3. Show all posts

Friday, June 1, 2012

white sangria recipe

a few weeks ago, i was tasked with concocting a delicious cocktail to complement the fajitas & handmade guacamole station at a recent cinco de mayo fete. i had to make enough to serve 40+ folks, so this is a bulk recipe for approximately 5 gallons.
the yummy white sangria with fresh strawberries from jaemor farm. served in mason jars with paper straws.

in order to keep the beverage chilled on a hot Southern day, i froze the fruit overnight so that it would act as ice cubes without diluting the cocktail.

here's the recipe i made up...and it was quite yummy. perfect for hot summer nights on the new porch swing.


First, it was critical to stop at a local farm stand to pick up their fresh strawberries. i cannot tell you how delicious my car smelled the entire ride!


fruit:
2 gallons of fresh strawberries, de-stemmed and quartered (smaller ones halved)
3 large grapefruits, cut to 1" slices
2 pounds of lemons, cut to 1.5" slices
2 pounds of key limes, whole
1 cup sugar
additional fruit for garnish


alcoholic version:
3x 64oz bottles of White Grape & Peach juice
3x 2-liter bottles of Ginger Ale
1x 96-oz bottle of Apple juice
5 bottles of chardonnay
(for smaller batches, use 1 bottle grape & peach juice, 1 bottle ginger ale, 24-30 oz apple juice, & 1-2 bottles of wine)

non-alcoholic version:
3x 64oz bottles of White Grape & Peach juice
3x 2-liter bottles of Ginger Ale
2x 96-oz bottle of Apple juice
1x 2-liter bottle of lemonade


instructions:
1. clean and cut all fruit as indicated. mix strawberries, grapefruit, and lemons in large bowl. add sugar and stir. freeze overnight. freeze whole limes separately overnight.
2. in 5-gallon bucket, mix all ingredients for either alcoholic or non-alcoholic version. stir. refrigerate in large bucket (if your fridge is large enough).
3. when ready to serve, pour cocktail into large beverage dispenser and add frozen fruit. stir for even fruit distribution & you're ready to go.
4. since the fruit won't fit through the dispenser spout, it's great to have skewered fruit available for garnish.
5. of course, serve it in a mason jar!


cost per 5-gallon batch:
White Grape & Peach juice: 3 x $2.98
Ginger Ale: 3 x $1.00
Apple Juice: 1 x $3.52
Fruit: $10-12
Wine: $25-30

Tuesday, September 13, 2011

m3: twist, and blend, and grind, and shout!

nope, it's not a dance move i picked up during my college days. it's an awesome 2-in-1 post to make up for my slacking on last week's ode to the mason jar. i guess i was a little too busy saying goodbye to summer & celebrating my birthday.


want to see what i learned? yup. it involves a mason jar. oh, and margaritas.

say you wanted to make some margaritas ahead of time...ya know, have 'em in the freezer ready to go so the blending & such didn't mess with your margarita-sippin' mojo. well, say you also were a *little* lazy & didn't want to wash unnecessary dishes. enter, this week's magical mason makeover!

yes folks, it doubles as a blender. realsimple enlightened me to this trick--genius!


apparently, most regular-mouth masons are a perfect replacement for your blender's pitcher. the blade attachment easily attaches to the mason's mouth. and here's my own skinny girl margarita recipe to boot!

after a little research, i discovered that it's no new invention, but an age-old secret. according to elise's mom (over at simple recipes), blender manufacturers used to include mason jars in their packaging. i guess mothers do know best. you can even use it as a spice grinder with zero cleanup!


so whether you grind nuts & spices, or if you prefer to blend frosty beverages, pull out the mason jar for easy blendin'!


Monday, August 29, 2011

m3: mason jar southern peach cobbler

as summer drifts away [okay, seems like kids are back in school but it's still a zillion degrees out], no southern summer is complete without homemade peach cobbler. and why not serve it in a mason jar?

[via]

it's a perfect way to serve cobbler, as it's the perfect portion! no fighting for the last bite--everyone has their own. since she's a georgia gal, i'm trusting paula deen knows her way around a peach cobbler filling. i'm adapting the cobbler itself + instructions for the mason jars.

preheat oven to 375.

for the filling:
4 cups [about 16 whole] fresh peaches, peeled, pitted, + sliced into small wedges
1 cup sugar
1/2 cup water

combine peaches, sugar, + water in heavy saucepan. mix well. bring to boil + simmer about 10 minutes. remove from heat.

for the batter:
1 cup bisquick mix
1 cup sugar
1 cup milk
1/2 cup melted butter
dash of salt

mix bisquick, water, salt, + milk in mixing bowl. stir well. add melted butter + combine. set aside


assemble the cobbler jars:
line a large baking dish with a non-stick liner [silpat or parchment paper will work]. spray 8 4-ounce mason jars with non-stick cooking spray. place jars in baking dish atop liner.

fill each jar with 3-4 slices of peach filling. top with 1-2 tablespoons of batter.

cook 30-35 minutes until tops are golden + bubbly. let jars cool to touch. top with vanilla ice cream + enjoy.

[via]


Monday, August 22, 2011

m3: mason jar vases

okay, this isn't rocket science. but it sure give me an excuse to share photos of my sister's amazing wedding in oregon! the talented chris becerra took the amazing photos, kudos incredibly well deserved. be sure to check out his full post.

[the beautiful guest book was a gift from college friend Vivian the Bolivian. according to her native tradition, each guest signs a page with a personal note. the newlyweds later add a photo of the signatory to the page, so it serves as a photo memento]


[cheers to the beautiful bride + dashing groom!]

[gorgeous stems we picked at the u-pick farm in springfield, oregon + lovingly arranged by raina powell]

oh, and a few of the party pennants i diy'd!


[O + H = OH! get it??]

[the bride used remnants from my pennant project to fashion the banner for the cake. so cute, right?]


Monday, August 15, 2011

m3: mason chandelier


this week's magical mason monday feature is all about the mason jar chandelier. similar to the hanging lanterns featured last month, the chandelier is a cluster of lit mason jars, suspended overhead. whether hung over a formal dining table, a tree branch, an outdoor pergola, or the kitchen sink, it's definitely a conversation piece!

whether lit by battery-operated LED votives like here:

or hardwired like the exeter pendant for sale from PB:

here are some basic instructions for constructing your own chandelier, regardless of light source.

what you'll need:
mason jars WITH lids. pick a size + quantity to suit you. personally, i prefer odd-numbered groupings.
ceiling light plate
if going the hardwired route: you'll need a hanging lamp kit [like this one] for each of your mason jars + a low-wattage lightbulb for each jar [vintage if you prefer, like these]
if going the LED route: you'll need a sturdy twine or other string + a battery-operated votive for each jar

for the hardwired version:
1. remove the lid of each mason. use a hammer and nail [or larger punch] to punch a hole in each lid, equal in diameter to the width of your lamp kit's cord.
2. with a light bulb in one hand, feed the cord through the mason jar lid. tighten the lid onto the jar. you can use the kit's tension clasps to keep the bulb where you want it. repeat for each jar.
3. drill holes in your ceiling plate [either a single hole large enough to fit the multiple cords, or individual holes for each jar's cord]. do not drill a hole too big, as the cords will slip through + come crashing down!!
4. pull the cords through the hole until you have each jar at its desired length from the ceiling. once you've perfected your cluster, tie a knot in the cords to prevent them from slipping through the ceiling plate.
5. install + enjoy. if you aren't electrically qualified, you may want to have an electrician install the light fixture.

for the battery-operated version:

1. remove the lid of each mason. use a hammer and nail [or larger punch] to punch a hole in each lid, equal in diameter to the width of your twine.
2. feed the twine through the mason jar lid. tighten the lid onto the jar. you can knot the twine on either side of the lid to keep it in place. repeat for each jar.
3. place a glue dot on the bottom of your battery-operated votive. place in the bottom of each jar, pressing down to secure.

4. drill holes in your ceiling plate [either a single hole large enough to fit the multiple lengths of twine, or individual holes for each jar's twine ]. do not drill a hole too big, as the twine will slip through + come crashing down!!
5. pull all of the twine through the hole until you have each jar at its desired length from the ceiling. once you've perfected your cluster, tie a large knot in the twine to prevent them from slipping through the ceiling plate.
6. install + enjoy. this version will require you to access the battery lights in order to turn them on/off + occasionally swap out the batteries. be sure to install in an easy-to-access place + at an accessible length.


enjoy!

Monday, August 8, 2011

m3: ice cream in a jar

it's hot. brutally hot. the heat index last wednesday was forecasted at 104 degrees. brutal. lucky for me, i'm in oregon where the high is 75.

for those of you not as lucky, here's some magical mason monday inspiration sure to cool you off.


mason jar ice cream!

here's an easy-peasy tutorial from theyummylife, so i won't be redundant.

[via theyummylife]

not only do they look divine, but i'm infatuated with the umpteen ways that you could package the cuteness out of these suckers.

like the wedding favors they did on stylemepretty here:
[via smp]

 or make a festive ice cream sundae:
[via firststreeticecream]


or brownie a la mode like here

[via just a taste]

happy monday!!

Monday, August 1, 2011

m3: luncheon favors

one of the marathon wedding events earlier this month included a bridal luncheon at the childhood home of the bride's bff [check out her post over at life is reed-iculous]. when we walked into the waterfront home, the tables were set with classic blue + white linens + dishware. an adorable favor marked each placesetting, fashioned from you-guessed-it, mason jars!

i'm no plain-jane mason jar snob as some may be, so i greatly appreciated the fanciness of the faceted version used to adorn the tables + mark our seats. i think they added a bit of glam to the favor. inside the favor were some scrumptious bacon-chocolate cookies that i tried to hide from cricket, with little success. you can check out the recipe here, much to the dismay of little piggies everywhere.

the favors were wrapped with a band of white tulle (very wedding appropriate), then wrapped with a length of navy grosgrain ribbon (navy being the hue du jour). a custom seal read "a sweet & savory treat" covered the ends, and all were wrapped multiple times with twine (who doesn't love a mason jar with twine?). the names were hand-stamped on the lids, which had coordinating stickers. the frilliness of the lace accents, the rustic twine, the hot pink stamped names, set atop a perfect-sized doily--it was just adorable.

masons can hold just about anything, and can be dressed up or down to suit your occasion. another bonus: they're travel-friendly. they're unlikely to break or leak inside a suitcase, despite the TSA's best efforts.

well done!

Monday, July 25, 2011

m3: moonshine

last weekend's bride + groom received a very special wedding gift.


the bride grew up joining her dad at an annual car show held at Lowe's Motor Speedway in Charlotte, which as i understand it, is pretty much an auto-themed swap meet. she + her dad would spend hours tending their "booth" at the track swapping one thing for another, and mostly people watching. over the years they became pals with their regular neighbors, some of whom are moonshine afficianados. when they found out about the engagement, they sent a special treat to the bride-to-be.

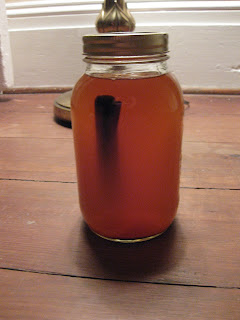
[apple pie moonshine with cinnamon stick]

not until the wedding day did she open it. while this series focuses on the many uses of the mason jar itself, lest we forget the utility of the mason jar box. these folks wrapped the special gift in a de-constructed mason jar case.

[mason jar box "giftwrap"]

[father of the bride + family checking out the goods]

the flavor was revealed: apple pie.

apple pie = danger. 

we became keepers o' the moonshine + were responsible for making sure it arrived safely at the after-party. let me just tell you,  this stuff tastes just like yo mama's apple pie. it didn't burn. it went down smoooooooooooooooooth. 

according to the bride's little bro, it's basically apple pie ingredients in a jar with a healthy helping of pure grain alcohol.

from what i understand, you can make moonshine in any flavor you wish. the basic instructions:

1. place fruit in a jar [for lemonade flavor, you'd use lemons. for apple pie, you'd use apples. etc]
2. add sugar + other seasonings [for apple pie, nutmeg, cinnamon, etc.]
3. fill the mason jar with pure grain alcohol.
4. close the jar. 
5. bury the jar in the ground, or store in a cool dry place.
6. once the fruit has disintegrated, it's ready to drink. if you use a cinnamon stick or similar hardy spice, it may not fully disintegrate. that's ok.
7. shake it up + pour. there's some discrepancy as to whether it should be chilled, served over ice, or consumed at room temperature. that's a battle i'm not getting in the middle of.

if you attempt to try your own, i'm sure you can find plenty of recipes on the world wide web. of course, i don't necessarily endorse any illegal behavior. but, if moonshine-running is what led to the wildly successful sport of NASCAR, they apparently were doing something right.


Monday, July 18, 2011

m3: lightning bugs

For this week's magical mason monday post, we're talking about something every southern child knows well. the chase, the capture, the release of the lightnin' bug.


I remember spending hours in my grandma's Memphis backyard chasing fireflies. Armed with a mason jar with a lid of carefully poked ice pick holes thanks to my dad, my sisters & I chased those lightning bugs for from dusk until bedtime. We competed for the most fireflies, the brightest jar, and the biggest of all bugs. In our older years, we smeared the poor souls on our white t-shirts for a short-lived glow.

Despite the romanticism of 3 young girls, I doubt we ever considered that we were interfering with Mr. Right finding Miss Right and the reproduction cycle of lightning bugs. Hopefully our efforts haven't diminished the population or the experience for today's young ones.

To fashion your own mason jar lightning bug kit:
  1. Grab a mason from the cupboard
  2. Dampen a paper towel & place inside the jar
  3. Place a piece of burlap over the rim OR use an ice pick to poke holes in the metal circular disc, and lock into place with the sealing lid.
  4. Run wild & catch the flashing fellas...GENTLY.
The firefly glow should last for the evening, but be sure to release them after they've served their nightlight duties.

Southern Living has a cute firefly label for your jars. Print 'em out & invite the neighborhood kids for a firefly party. Of course, it wouldn't be complete without a little fun for the adults: serve Firefly sweet tea vodka over ice with a lemon wedge & sprig of mint, in a a mason jar of course!


What's your favorite firefly memory?

Monday, July 11, 2011

magical mason mondays

so, one of the best things about mason jars is their uncanny ability to do just about anything. not only are they versatile, but also uber stylish. i'm going to dedicate mondays to the reveal of a new use for the standby mason jar. so, prepare to be amazed on mondays + inspired to find a clever use for the pantry staple.
this week's mason jar magic inspiration:
swoon. if only our cluster of 3 peach trees weren't a) dying and b) tiny, i would have so many dinner parties set up beneath them. but, these little hanging mason jar lanterns are super easy + super functional.

we made some of these last summer from recycled baby food jars, but now i want to mix in some of the large mason sizes for varied depth. for the sake of redundancy, you can follow this tutorial to make your own. the steps are simple:

1. clean your jar
2. cut mid-to-heavy gauge wire long enough to wrap around the jar's neck, plus an extra two inches. at least 16 gauge wire is recommended, even stronger for your heavier jars.
3. create a "necklace" for your jar's neck by wrapping the cut wire around the jar's neck one time. as you wrap, create a small wire loop on each opposite side of the neck. let's call these little loops "ears."
4. fasten the "necklace" to itself by twisting the ends together. you want it to be very tight so that it doesn't slip over the jar's rim.
5. determine how you want to hang your lanterns--if you want them to blow gently in the breeze, use twine. if you want them to stay pretty still, use your wire.
6. cut the twine/wire to desired hanging length. wrap one end of the hanging twine/wire around a jar's "ear," and tighten by twisting. repeat with opposite end of twine/wire and opposite "ear."
7. fill your jar with sand
8. insert candle - tea lights for the baby food jars, votives for the regular sized masons, and even larger pillars for the larger jars for drama
9. light + enjoy the ambiance
10. if you feel like getting fancy, you can wrap your lanterns in ribbon, paint them with spray paint, or heck, even be-dazzle them for extra sparkle.

abracadabra. from mason jar to romantic night lights.

ps - these guys are sturdy enough to keep outside year-round in most climates. just dump out the water after it rains. if you live in a super hot climate, you may want to remove the candles during the summer so they don't melt. the wire will rust over time, but it just adds to the charm.