Monday, April 25, 2011

smoke 'em if ya got 'em

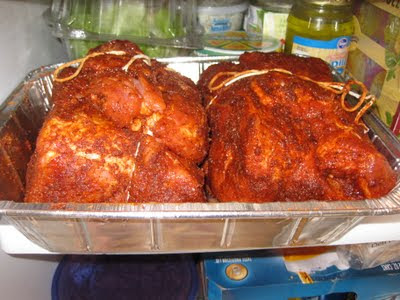
for the shower a few weeks ago, cricket was in charge of the pulled pork. he's becoming fairly famous for his yumminess, so i snapped a few pics. sorry, he won't let me share too many details. grab a napkin, you'll probably start to drool shortly.

we smoked two pork butts on our super awesome big green egg. cricket has concocted a super secret blend of spices that he won't share. from what I gather, it includes salt, pepper, brown sugar, paprika, and about a dozen other things. he rubs the spice blend into the crevices, then ties each butt with twine to keep it compact for even cooking.

these two butts were each about 4 pounds and fed 20-30 people.


now time for the smoker. the handy dandy digital thermometer helps monitor internal temperature...and he can check it FROM THE COUCH. spoiled? maybe a bit. while it cooks, cricket usually spritzes the meat with apple juice. he uses a fancy pink spray bottle too. nah, not really. it's actually a very manly spray bottle.


doesn't it look gooooooooooooood? just imagine how the house smells now...and the entire neighborhood for that matter. the dogs are foaming at the mouth. me too just typing this.

once internal temp reaches 190-195, the butts are ready to be removed from the heat. in this case, it was about 11 hours. ELEVEN HOURS. which makes the remote thingy very valuable!


pull the suckers off the grill, and let sit for a few minutes so the internal juices redistribute. then, start pulling apart. it'll be HOT so thermal gloves are encouraged.


once shredded, throw it on a king's hawaiian sweet roll with a few dill pickle slices and a dab of sauce. and then have another. or twelve.


i highly recommend this non-mayo slaw to add a little tang on the side. thanks martha!!!

Wednesday, April 20, 2011

the week started...errrr...well

i headed to grab lunch on monday and my car wouldn't start. it did on the second try, but the key symbol kept lighting up & flashing. great.

cricket did a little research that told him the "immobilizer" was worn out. i guess the car thought i was stealing it (would've been a helpful feature when my car WAS stolen last summer...luckily, the flat tire prevented the thieves from getting down the street). we tried the spare key, as instructed by the service dept. no dice. result:


the diagnosis? dead freakin' battery. despite the service tech telling us that if the spare didn't work the only option was to get it towed. despite cricket & tow man pushing the car down the driveway (while i steered, thank ya very much). despite the $80 tow. despite the 60k, 75k, and 90k mile service i'd been avoiding. oh, snap.

the lesson: pay attention to your service milestones, people.

the car has been returned to its place in our driveway, fully functional. and we got to drive the 2011 acura mdx....and it is niiiiiiiiiiiiiiiiiiiiiiiiice.

Friday, April 15, 2011

cake pops

we co-hosted a baby shower over the weekend and favors were one of our "to-do's." being a fan of all foods on a stick, i made my first attempt at cake pops. YUM!

if you haven't heard of cake pops, you soon will. bakerella stumbled upon these gems back in 2008 when she put her cake balls onto lollipop sticks, and she's taken the baking world by storm since. her book came out last fall and is chock full of dozens of cake pop recipes.
[via amazon]

here's my step-by-step for these fun favors:


supplies:
cake mix
pre-packaged frosting
sprinkles of choice [i used white sugar crystals and rainbow nonpareils, which are 1/2 the price at kroger vs. michael's]
candy melts in choice of color [i bought these at michael's, when they were on sale]
lollipop sticks [i used 6"]

instructions:

bake a pre-packaged cake mix as directed. i used a Betty Crocker chocolate fudge cake. let the cake cool, then crumble the cake into a large bowl. mix in 1/2 container of pre-made frosting and work with your hands until the mixture is well-combined. i added an extra spoonful of frosting for consistency. i used Pillsbury dark chocolate. roll the mixture into compact balls, approx 1" in size. cover and refrigerate for at least one hour. i refrigerated mine overnight.


melt the candy morsels as instructed on the package, stirring periodically. because i was making 2 colors, i used 1/2 package of yellow morsels and 1/2 package of white morsels. if i'd had a fondue set, that would've been ideal. i had some trouble keeping the candy melts the right consistency for dipping, so a constant heat source would've helped. insert a lollipop stick into the flat end of the chilled dough ball. insert it at least 1/2" into the ball, but not all the way through the center. dip the pop in the melted candy coating, coat to cover.


dip into sprinkles, or hand sprinkle as desired. i found that the colored sprinkles made the pops too top heavy, so i opted to hand sprinkle those. the white sugar crystals were fine to fully coat, though.


set into styrofoam to dry. i wrapped my styrofoam block in plastic wrap so i can re-use it with easy clean-up. candy melts will harden in a few minutes.

package into a small cello bag, tie with ribbon for a to-go treat. i displayed them in a basket filled with raffia for the shower. but a friend also displayed hers by placing ball-end down, resting in cupcake liners.


this is super easy and you can mix & match so many flavors! i haven't ventured to test my creative decor skills like bakerella has mastered, but maybe someday.

i think the next flavor will be a chocolate and peanut butter. like a peanut butter cup on a stick. yes please!

what are your weekend baking plans? what flavors of cake pops do you want to try for yourself?


Tuesday, April 12, 2011

need your help with landscape design!

greetings blogland! i call on you today for helping with a critical decision. you've seen the tiered garden here, here, and here. the original plans call for a bench in front of the box, but we can't get started on the bench until we figure out what we want to do with the patio area.

we'd like to extend the living space into the lawn, and just can't decide what types of pavers we want to use. the space in front of the tiered planter measures 12' across and we'd like to extend about 18' towards the back yard.

the upper patio is the old parking pad, thus concrete. it's been painted & we're currently pressure washing to remove the chipping paint. i'm thinking of staining it afterward. i tell you this because whatever we lay in the current grass area below will need to be cohesive with the upper patio and "flow" aesthetically.

from the original listing photo
then the lower area we're working on. the bench will go in front of the planter. the new patio area will extend from the base of the planter & stairs for about 15-18 feet, running along the house on the right and the fence on the left.


at the edge of the house, the backyard opens up like this:

we plan to put some beds around the edges of the yard, maybe a new [read: taller] privacy fence.


requirements:
  1. provide extra seating/entertaining space for 2 club chairs, 1 chaise, and a side table (plus the bench). we've already bought the furniture.
  2. help with water run-off into the basement
  3. be a clean design
  4. use inexpensive materials that will live up to full afternoon sun elements & all-season weather (i knew folks once who used some fancy slate in their outdoor walkways THAT COULD NOT GET WET WITHOUT DISCOLORING. luckily, they had a staff who would literally wipe it down anytime it rained. did i mention this was on the gulf coast, ocean front? beautiful, yes. sensible, not so much.) i don't have a wipe-down staff, so this is not an option.


here are some ideas we like...
via

via
via

i like the larger square pavers, at least 20" square. i'm thinking of a tighter pattern nearest the bench, slowly expanding as the lawn opens up.


are we nuts to want grass between the pavers? is that a maintenance nightmare? anyone have any experience with this?

do you like tighter spaces, or larger spaces between the pavers?

also, what should we grow between the pavers? i've heard dwarf mondo grass as used here, but it seems kinda bushy.


or blue star creeper like this, which according to the Pike's Nursery sales flyer "spreads to form a low, dense mat. Tiny sky blue flowers emerge in late spring and last until early fall." that sounds nice, right?

or this scotch moss as suggested when i used the handy tool at stepables.com

or this miniature brass button groundcover from stepables.com?


decisions, decisions, decisions.

please help!!! 

we need to figure out the pattern AND the materials, so all input very very very welcomed.

Thursday, April 7, 2011

[insert tomahawk chop here]


less than 24 hours until first pitch. opening day at turner field may be one of my favorite days of the year. it's definitely up there with thanksgiving and christmas. ya know how those days have their distinguishing scents? turkey, stuffing, pumpkin pie, evergreens, cinnamon...the list goes on. well, opening day at the ted has its own: hot dogs, cold beer, the freshly cut grass, the linger of gasoline as the fighter jets fly over, cotton candy in the stands.

it's just all. so. grand!!!!

tomorrow is no exception. yes, atlanta, traffic will be a nightmare. (ya know it wouldn't be if it were deemed a real holiday + no one had to work.) added to the regular opener excitement, we get the following bonuses:

timmy hudson on the mound
the phillies are a comin' to town
wondrous walter returns to his post
the chophouse crowd lookin' better than most
fredi at the helm, though bobby will be missed
we'll be tomahawk choppin' -- not pumpin' our fists!
(i really didn't set out for this to rhyme...but i went with it)

are you going to a game this weekend? what's your favorite part of the home opener? what's your fave memory at the ted?

Monday, April 4, 2011

tiered garden, part 3

with the boxes built as seen here and here, we're ready to get our gardening on. you'd think i'd have a greener thumb than i actually do, seeing that my maternal grandparents owned a nursery with umpteen greenhouses + my paternal grandmother was a master gardener. but no, i needed help.

luckily, i'm on the catalog mailing list of Gardener's Supply Company. they have a very handy online kitchen garden planner tool to help you plan your garden. there are pre-planned gardens or you can customize your own based on your dimensions and choice of veggies. it'll tell you how many of each to plant using the square foot gardening method, briefly described in this post and also give you planting/care tips for each vegetable you select. i used this handy chart on companion planting to determine the optimal placement for each plant.
 
[kitchen garden planner from gardener's supply]
based on this planner, we went to Lowe's to pick up the soil + plants. for soil, we calculated 20 cubic feet + opted for a mix of Miracle Gro garden soil, topsoil, and fertilizer (manure). for plants, each square will hold:
  1. 1 green bell pepper
  2. 1 yellow bell pepper
  3. 1 seed packet of okra
  4. 2 cucumber seedlings
  5. 1 straightneck summer squash plant
  6. a bunch of texas sweet onion plants
  7. 2 tomato plants - one big boy, one hybrid
  8. 1 greek oregano
  9. 1 poblano pepper
  10. 2 sweet basil
  11. 1 citronella mosquito plant [this wasn't in the original plan, but figured it'd be a nice addition once we add the bench; there wasn't any broccoli, so we swapped them out]
  12. 1 sage
  13. 1 thyme [planted this with the sage]
  14. 1 packet mesclun green seeds, 1 packet arugula, 1 packet lettuce
  15. 1 packet spinach seeds
  16. 1 strawberry plant
*did you know that the plant tags now have QR codes? this is so clever!

we filled our boxes with soil: about 2 parts Miracle Gro, 2 parts top soil, 1/2 part manure. i filled the boxes to about 1 inch of the rim. i used masking tape to mark my 12" sections for the square foot gardening method. then i began planting, following my handy map.


we're really excited about the garden! no back-breaking labor, no weeds, and hopefully a healthy, fresh crop in the coming months. next, we'll be adding the bench to the front of the planter, laying patio pavers to extend the living space, and assembling the patio furniture. but first, we need a nap.

the planting part of the project only took 30-45 minutes. i probably spent more time planning what to plant than actually planting.

cost:
soil + vegetables: $120 [we had a few bags of soil left over, but they'll be put to use another time]

tiered garden, part 2

after we built the frames, it was time to install the bottoms for the planter boxes. we used 1/2" thick treated plywood for the bottoms. yes, treated as explained in the first part of this series.

before we could install the plywood, we used scrap 2x4s to create a frame/support for the box bottoms.


 with the supports in place, we laid the plywood on top to form the bottom...

this was a bit of a pain + we found that doing it in 2 pieces was much easier than working with the longer 8' piece. we notched out the posts and screwed into place with a few screws, knowing that the dirt would hold it into place.

to hopefully prevent ourselves from growing extra toes or ears, we lined the treated lumber boxes with 4mil plastic.


we stapled the plastic liner into place + drilled a few drainage holes...


...now we're ready to plant!!

believe it or not, this was the most time-consuming part. it's a good thing cricket is so compact--he was having to maneuver in + out of the boxes to attach the supports. this probably took us about 3 hours. a whole lot of: measure, cut, screw, repeat.

cost
the sheet of treated plywood + plastic: $48.11

Sunday, April 3, 2011

tiered garden, part 1

we're hosting a couples' wedding shower in our backyard next month, so we're on a mission to get it in shape to show off. this is part one of the first project - the tiered veggie garden.

the concept of square foot gardening caught my attention a while back, mostly because i'm not sure we'd actually eat a year's worth of crops. ever. basically, the square foot gardening (sfg) concept, developed by Mel Bartholomew, maximizes crop output while minimizing space/materials/effort. it's efficiency at its best, and i love me some efficiency! so we've been talking about building some raised garden beds to try our hand at growing some veggies this summer. it finally struck me that we had a perfect spot!

just off the patio stairs, there's a little alcove that gets full sun. it'd be great to build the beds at waist level or higher, so i wouldn't have to bend over to care for the crops. so, i sketched out some plans and came up with this:
[side view of planters with bench in front]

[front view of bench + planter tiers]

cricket approved and we got to work. the alcove was perfectly 8' wide, so it made for some easy assembly using 8' lumber. we adjusted some of the dimensions as we went. instead of 1x12s, we used 1x8s for the front. and the bench height would be 18" inches...so we adjusted the box heights a little to look better with against the side stairs. we used treated lumber to keep it rot-free. now i know what you're thinking--treated lumber for a garden? well, i did some research, which led me all sorts of places, but particularly here: http://www.naturalhandyman.com/iip/infxtra/infptforraisedgardens.html

i still wasn't 100% convinced my tomatoes wouldn't be lethal, and paying 3x for cedar was out of the question. so we decided we'd line the beds with plastic to minimize any soil contact with the lumber and hope for the best. if i grow an 11th toe, we'll all know why.

first, we got to work digging out the grass in the area...


then, we set the posts for the rear box + made sure they were level heights...
 ...and the front box...

...and framed in the bottom...

once the frame was in, we added a center post for the front + rear boxes. we added landscaping fabric underneath the boxes to make sure weeds wouldn't grow through the garden.

then we built up the facade, starting at the top + screwing into place one board at a time...


[view of the interior boxes. note that the rear box does not extend to the ground.]
 
this part of the project took about 2 hours + went pretty quickly once we got the frame built. next up, the bottoms of the boxes...

cost:
the lumber + screws = $158 [we had an extra post + 1x8]