Showing posts with label upcycled. Show all posts

Thursday, September 18, 2014

Family Room Reveal

Here's a quick update on the almost finished product. It's taken a long time to take photos since the moments of the house being quasi-clean, having good lighting, and having the toddler entertained elsewhere are few and far between. It's like a split-second utopia.

Overall, we love the house. We still have some nesting to do, but it will come (right??). The big stuff is complete, and making it ours is a work-in-progress. We are getting there slowly but surely. But, here's where we are today...


the little rocking chair was left with the house. i painted it & B loves having his own "big boy" space in the family room.


Need a reminder of the before? (shield your eyes from the shag carpet!)


The inspiration behind the transformation...


Favorites in this room:
  • The black windows. Replacing all of the aluminum-framed casement windows throughout the house wasn't in the budget. Painting them black gave them an INSTANT update and we love it, despite the pain it was to get the painters to finish the job correctly.
  • Natural light
  • Fireplace - hubs did an amazing job installing the wood cladding. 
  • Fireplace surround
  • Shelving update - a little trim on the shelf fronts and paint on the rear wall is another instant update
  • B's play area isn't as pretty or contained as the Sarah Richardson in me would like, but I wouldn't trade having him a place to hang out for all the designer fabric in the world.

Details:

  • Rug: One Kings Lane
  • Bench: Antique
  • Mantel: Custom reclaimed Douglas Fir
  • Fireplace surround: Absolute Black granite, honed
  • Fireplace cladding: Custom
  • Armoire: Crate & Barrel
  • Curtains: Ikea
  • Wall hanging: vintage
  • Paint colors: see here

Kitchen Reveal

As we near a year on being in our house, it's about time I post some pics of the finished product. Well, almost finished. Between trying to finish some little projects and keeping the house quasi-clean amidst a toddler's endless energy, it's been tough to get photos. Let alone upload them and find time to post them. So, bear with me.

We are really happy with our kitchen, to say the least.

It started ugly, but with a little inspiration like this...


...we went from drab to fab.


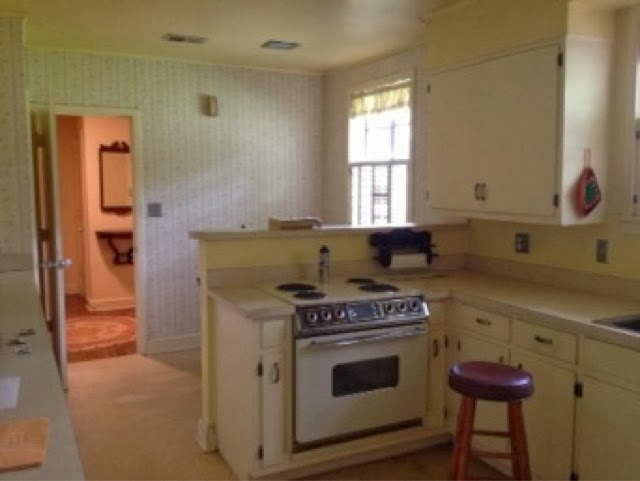
We didn't do too much in this room from a structural perspective except remove the peninsula. Knocking down the bulkheads helped to elevate the ceilings and open up the space all around. We removed the pantry and replaced it with floor-to-ceiling pantry cabinets for more functional storage.

Before:

After:


Before:
After:


Before:

After:

Some of my favorites in this room:
  • Dual fuel range - this sucker can turn out some yumminess in a jiffy
  • Bench storage & window seat - perfect spot for coffee and family meals
  • Open shelving - this is uber functional for us and we're surprisingly able to keep it tidy. We love the mix of old & new that this adds, too.
  • Marble counters - we languished over this decision a good bit, and we're ultimately really happy with it. More on that coming in a future post. 
  • The openness - we originally planned to have a small island in the middle of the kitchen, but we nixed that after living in the space a while. We love being able to dance during dinner prep (neighbors must love watching us) and Burke can spread out his toys to really make quite a mess.

Details:
  • Cabinets: Wellborn Shaker full overlay, glacier white
  • Countertops: honed Carrara marble, more on that search here
  • Shelves: Custom from reclaimed Douglas Fir
  • Hardware: Signature Hardware and My Knobs
  • Bench: Custom
  • Paint colors: see here
  • Lighting: Restoration Hardware (over sink) and Ballard Designs (over table)


Tuesday, October 15, 2013

Renovation: Living Room Inspiration

With the renovation going so slowwwwwwwwwwwwwwwwly, I've had entirely too many nights to peruse Pinterest & Houzz. Of course it goes to reason that after spending endless hours pinning images, I find "the" inspiration pic I've been looking for while browsing the website of a home decor store that's less than two miles from my sofa. Stumbling upon it was like finding the Holy Grail. The skies parted, rainbows appeared, and a chorus of butterflies and angels echoed harmoniously. Okay, maybe not quite that dramatic.

And here she is:

originally from Stanton Home Furnishings
This room has a very similar layout as our living space, which is what proved so hard to find. The back door to the back porch creates a weird walkway that needs to be kept clear. The fireplace is centered on the opposite wall, but the room isn't all that wide, which makes furniture placement tricky. The room is about 15' wide (fireplace to opposite wall) and 21' deep from the windows to the built-ins/foyer entry.

For reference, here's what we're working with (apologies for the phone pics):

looking from foyer

looking from dining. foyer to the right

I know I want ample seating in this room. It's where we'll spend the majority of our time, and our previous den just felt cramped when we had anyone over to visit.

Using the furnishing we have, or that I've had my eye on for a while, here's my design "plan." Of course, once we get the furniture in place, there may be some shuffling. But at least there's a starting point. 


A sofa and a side chair just isn't enough seating for our family. I like the idea of a swivel on the far end of the room so we can play with B or swivel right around & be part of whatever's happening in the den. Jason says I tend to overpack a room with furniture. Is it too much? What do you think?


Friday, October 4, 2013

Renovation: Kitchen Inspiration

I've always dreamed of renovating a kitchen. Making it my very own. No quirks unless I handpicked them. And now, well, it's kinda overwhelming.

We want the finished product to not only reflect our personality & style, but also be true to the time of the home and neighborhood.

A little vintage, a little modern, a little farmhouse, a little utilitarian, a little classic traditional, a little whimsy, with a lot of easy-going comfort.

images via my pinterest board

Expect lots of white subway tile, open shelving, casual comfort. White shaker cabinetry. Antique brass. Reclaimed wood. Carrara marble. Aged steel. Forged iron. A corner built-in eating nook. Wide plank hardwood flooring.

Let's do this.

Wednesday, March 14, 2012

Salvage Show in Atlanta

I've been a bad blogger. Maybe I need inspiration. And I think this is just where I'll find it:

Salvage is hosted by the Indie Craft Experience and is billed as a "curated vintage marketplace...featuring vintage clothes, decor, home goods, books, furniture, and more!" It's coming up in Atlanta on April 14, 2012 and will feature all sorts of cool vendors showcasing their vintage modern masterpieces. And food trucks.


And did you know....they are having a MASON JAR COMPETITION!!! WHAT?!?! I cannot wait to see what some of these genius artists come up with!

$5 at the door. Cannot wait!

Saturday, January 14, 2012

chippy door coat rack

i introduced you to my chippy door in november, remember her? she was $40 (which was a little more than i'd hoped to originally pay for an old door, but given the odd size constraints my project required, i succumbed, and she was worth it.) poor thing was sitting outside at Scott's Antique Market, wasting away growing character in the elements just waiting to find a home.

[door awaiting her new lease on life]
 well, her time has come for a second life.

our hallway is host to our electrical panel, which, as we all know is an eyesore. but you can't completely block the panel because you'll inevitably be fumbling around in the dark to flip the breakers. our house doesn't have much of a foyer, mudroom, or entryway. this leaves our guests without much place to hang their coats + purses during their visits.

no more...

after bringing home the oddly-shaped door (i wonder where it was originally used...it's too short for a real doorway), we let it air out on the patio for a few days until we were able to gently sandblast it to remove the loose paint. be gentle--the chippy paint is part of the charm. the cobwebs are not.


once dried out, we applied a few coats of polyurethane to the door to make sure the charming paint chips wouldn't transfer to any guest's coats or handbags. let it dry overnight.

attach the hooks (mine were from anthro, on sale for $5 each).

to attach the door to the wall, it needs to be easily removable yet sturdy to handle the weight of purses (ahem...anyone else relate to Chief Brenda Lee Johnson of the LAPD?). we used simple bolts screwed into the wall's studs. it was most important to find the studs, then we adjusted the hangers on the back of the door to match. we had to be sure to cover the electrical panel while keeping it evenly spaced between the adjacent door frames. the height should be comfortable for those who will hang items here (or if things need to be out of reach of pets or kids). you don't need it to protrude from the wall too far, maybe 1/4-1/2 inch?


once you've installed the bolts into the wall, measure the distance between them. transfer those measurements to the back of your door. attach the hangers into place.

hang the door. voila!


i may add a few knobs to the center section of the door to hang smaller items, but i haven't gotten to that yet. we're pretty happy with our solution, and it looks SO much better when you walk in the front door. it hangs directly across the hall from the hall closet, so this is a super functional place for those pieces we wear daily--especially this time of year.

yeah, a piece of art would've worked, but this is also incredibly functional. design + function = win.

project cost:
reclaimed door: $40
hooks: $5 x 3 = $15
poly: already had
bolts & hangers: $5

total: $60