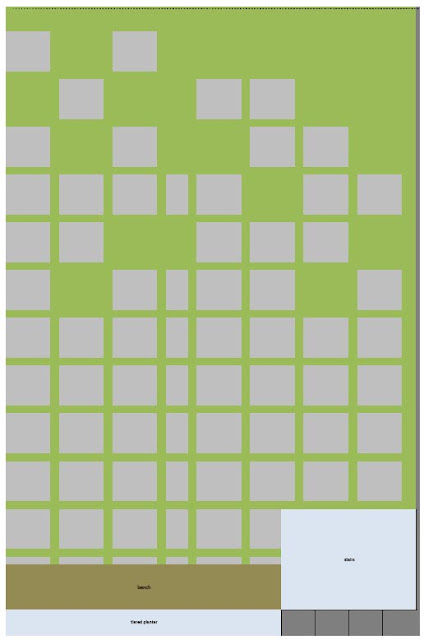
- tiered planter
- built-in bench seating
- creating a lower patio, to serve as a seating/lounge area
- improving drainage; reducing water flow into the crawl space
- installing a french drain
- creating a "flow" from the backdoor, through the upper patio, through the lower patio, into the lawn
We rented a tiller and tilled up all of the grass & dirt between the house and fenceline. Once tilled, we moved the dirt around to level out the area as much as we could. At this point, we installed the french drain.
 |
| [cricket moving dirt] |
Then we laid landscape fabric to help with weed prevention.
 |
| [after about 15 bags...plenty more work to be done] |
We spread about 40 bags of sand throughout the area to help fill in major holes and provide a paver base. We tamped the sand to compact it and [hopefully] reduce future settling.
 |
| [this was the 2nd batch of sand we bought. so. much. sand.] |
Getting the pavers (37 pounds each) from here:
...to here:
...cost us $50 and 2 bottles of water. We probably also owe the neighboring churches a sincere apology for the truck's backup "beep-beep-beep" during their Easter service.
Once the sand was in, it was time for the pavers. Cricket had some studying to do, so it was up to me to put the paver puzzle together. I'd mapped out the design using a combination of 16"x16" concrete pavers and 8"x16" concrete pavers, all being 2" thick.
I used a 2x4 to help level the sand. Dragging the 2x4 across the sand helped to fill in & level the area I was working with. It's much easier to work a small section at a time. I use 2x4 scraps as spacers, too. Then, I just followed my pattern and laid the pavers one by one.
The pavers are each about 37 pounds, so it was like doing squats with 40-pound weights. I paid for that the next day. And the next. And the next.


awesome! yall are such planners...
ReplyDeletecan't wait to see the finished product. wish i could make it to the shower :(